Workspace
The Multiphonics CV‑3 workspace is composed of a rack that displays the current patch1, along with a toolbar and various utility panels.
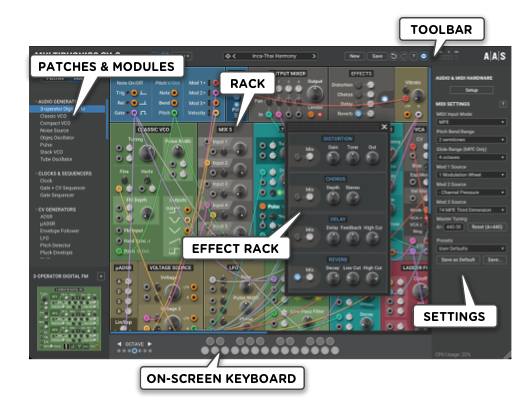
Toolbar ⚓︎
The toolbar covers the topmost part of the Multiphonics interface and is always visible.
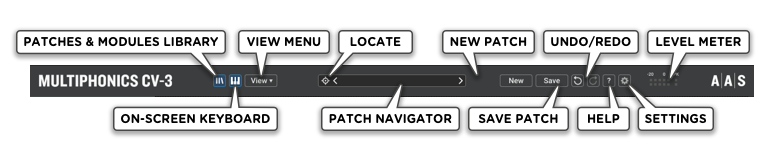
Patches & Modules Library Switch ⚓︎
Shows or hides the left panel which holds the Patch Browser and the Module Browser.
On-screen Keyboard Switch ⚓︎
Shows or hides the on-screen keyboard to play synth patches.
This switch does not exist in the effect plug-in.
View Menu ⚓︎
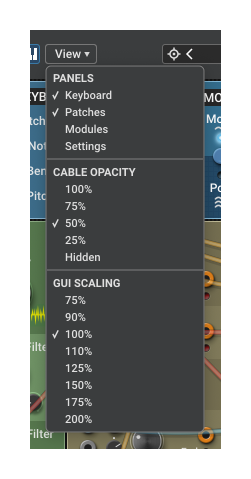
The view menu lets you customize your workspace. It has three sub-sections:
- Panels Choose which panels are visible.
- Cable Opacity Cables can be opaque (100%), translucent (75% to 25%), or hidden.
- GUI Scaling Makes the whole GUI smaller or bigger. While the handle at the bottom-right of the window will change the workspace size, the GUI scaling setting will change the size of the GUI elements within the window.
Locate Button ⚓︎
Pressing the Locate button will open the Patch Browser and highlight the current patch.
Patch Navigator ⚓︎
This area shows the name of the current patch, and provides left and right arrows to navigate to the previous or next preset. Clicking on the patch name will open a menu from where you can load any patch in the collection that is currently opened in the Patch Browser.
New Patch ⚓︎
The New button clears the current patch and opens the Module Browser so you can start building a new patch right away.
Save Patch ⚓︎
The Save button opens a dialog that lets you save the patch. Saving is described in depth in the Patching—Saving Patches section.
Undo/Redo ⚓︎
The Undo button lets you cancel the changes you made to the patch (in reverse order). Multiphonics is very forgiving: every change in the rack can be undone, even loading a new patch or clearing the current patch with the New button. Up to 100 changes can be undone.
The Redo button re-instates the changes that have been undone. It is only active if you have not changed the patch since the last undo.
Help Button ⚓︎
The Help button opens the About window, which shows the product version and your registration information. Clicking on the Multiphonics CV‑3 Manual button will open the manual you are currently reading.
Settings Panel Switch ⚓︎
Shows or hides the Settings Panel.
This switch does not exist in the effect plug-in.
Level Meter ⚓︎
The level meter shows the current RMS value of the outputs. For geeks out there, it is calibrated so that a 10V peak-to-peak sine wave—such as the Classic VCO sine wave output—just barely registers at 0 dB on the level meter when the Output Mixer gains are all at 0 dB and the signal is centered.
The peaking (PK) LED will turn on after a few samples of clipping, which occurs when the signal goes beyond ±25V. If the Output Mixer limiter is enabled, there will be no clipping.
Patch Browser ⚓︎
The patch browser is found in the left panel. The patch library is split in different collections, which are displayed when the patch browser is first opened. We call this the collection list.
Collection List ⚓︎

The collection list always contains the following items:
- Top Section
- All Patches This special collection shows all patches from all collections.
- User Contains any patch that you created, modified and saved, or imported from another source. It also contains a special Featured category which is described in the next section.
- Factory CV‑3 Contains all patches that come with Multiphonics CV‑3.
- Sound Pack Section
- AAS Web Store Opens the AAS Web Store in your web browser, where you can purchase additional content for Multiphonics CV‑3.
- Legacy Section
- Factory CV‑2 Contains all patches that originally shipped with Multiphonics CV‑2.
- Factory CV‑1 (instrument only) Contains all patches that originally shipped with Multiphonics CV‑1.
If you have purchased Multiphonics sound packs, they will appear in the Sound Pack section. In the image above, we can see the Modular City sound pack.
Clicking on a collection will open the list of patches in that collection. We call this the patch list.
Patch List ⚓︎
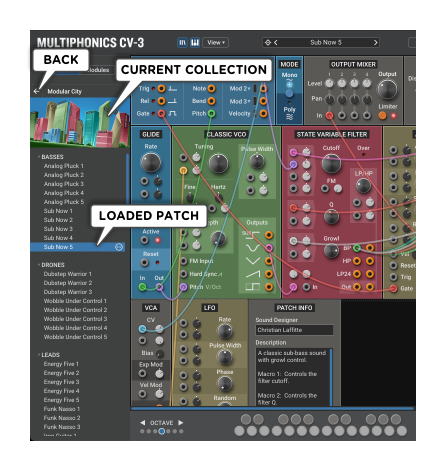
In the patch list, clicking on a patch name will load the patch. The current patch is always highlighted.
To return to the collection list, click on the back arrow, or anywhere on the current collection image.
Within the patch list, patches are organized in categories that describe the kind of sound produced by the patch. Instrument patch categories have names like Basses, Leads or Percussions, while effect patch categories have names like Distortions, Filters or Reverbs.
To reduce visual clutter, the contents of a category can be hidden by clicking on its name.
A patch may refer to an MPE controller in its name, like Bansuri Vibes (Osmose). It will typically require the Keyboard Mod outputs to be used in a way that best suits the specified controller. However, it may still be possible to play and enjoy it with a different controller. Usually, there will also be a standard version of the patch can be played with any MIDI or MPE controller, though its expressiveness may be somewhat more limited.
Featured Patches ⚓︎
The Featured category is a special patch category that is always listed at the top of the patch list when the All Patches or User collections are selected. It is stored in the User collection even though it initially contains a selection of the AAS staff’s favorite factory patches.
Any time a new Multiphonics CV‑3 plug-in instance is loaded, it will automatically open the first patch in the Featured category. Since this category is stored in your User library, you can replace its contents with a selection of your own favorite patches.
If you like a patch from the Factory library and want to keep it in the Featured category, simply click on Save in the toolbar and choose Featured from the category list. The patch will now be easy to find at the top of the patch list.
On disk, this category is stored in a folder in your user library. If you delete all patches from this folder but leave the folder in place, the Featured category will no longer appear in the patch list and new plug-in instances will open with an empty rack.
If you delete the Featured folder entirely, it will automatically be re-created and filled with the original AAS staff picks.
The first time the standalone version of Multiphonics CV‑3 is launched, it will load the first patch from the Featured folder. After that, it will automatically recall the contents of the rack as they were when it was last used.
Renaming, Moving, Importing and Exporting Patches ⚓︎
Each patch is stored in a small file on your computer. Instead of inventing a new way to organize and manage files from inside Multiphonics, we decided to take advantage of the powerful tools that are already on your computer. Any file operation you may want to do on a patch can be done with the Finder (Mac) or Windows Explorer (Windows).
To open a Finder or Explorer window in the folder where a patch is stored, right-click (or control-click on Mac) on its name in the browser and choose Show in Finder (Mac) or Show in Explorer (Windows). Alternatively, you can click on the patch name to load it, then click on the ![]() icon next to the name, and select Show in Finder (Mac) or Show in Explorer (Windows) from the menu.
icon next to the name, and select Show in Finder (Mac) or Show in Explorer (Windows) from the menu.
Renaming or moving a patch is just a matter of renaming or moving its file. Here is an example of how to rename and move a file on a Mac:
Exporting a patch is done by sending the file by email, file-sharing service or instant messaging to its intended recipient. Conversely, importing a patch is done by copying a file you received into a folder in your User collection. You can open a Finder or Explorer window in your User collection by right-clicking (command-clicking on Mac) on the User collection name or image in the collection list and selecting Show in Finder (Mac) or Show in Explorer (Windows) from the menu (this is not possible on the special All Patches collection).
The User collection is not stored in the same location as the Factory and sound pack collections. Since the latter are stored in a read-only area of your computer, it may not be possible to rename, move or add new patches in those collections.
On disk, the patch categories are the first level of folders under a collection. The patch browser only displays patches stored directly in a collection’s folder, or in one of its sub-folders. Deeper folder hierarchies are not supported. For example, in the following hierarchy that represents the User collection, the patch Hidden Bass under Sub-Folder would not be visible:
- User
- Basses visible collection
- Deep Bass visible patch
- Electro Bass visible patch
- Sub-Folder not visible
- Hidden Bass not visible
You can use this to your advantage to hide unfinished patches that you don’t want to see in the browser but that you may wish to revisit later.
Module Browser ⚓︎
Modular synthesis patches are made of interconnected modules: tone generators, filters, modulations sources, etc. These modules are found in the module browser.
Modules are organized in these categories:
- Audio Generators These modules produce audio-rate signals. A patch will usually contain at least one audio generator to produce sound. This category contains various virtual analog, digital and physical modeling oscillators, as well as utilities that generate different kinds of signals at audio rate.
- Clocks & Sequencers Sequencers let musicians create musical sequences, beats, arpeggios or complex CV patterns that play at a rate defined by a clock signal. Clock modules can provide these clock signals.
- CV Generators The purpose of control voltage (CV) generators is to generate voltages that will control other modules through their modulation inputs. This is where you will find envelope generators, low frequency oscillators (LFO) or modules that generate CV from audio signals like the Pitch Detector or Envelope Follower.
- Filters Filter modules will shape a signal by filtering-out some frequencies. They may also color a sound by adding emphasis to some frequencies, and even add new harmonic content through saturation and audio-rate frequency modulation.
- Maths This category offers modules that perform simple mathematical or logical operations on their input signals. They will generally be used to transform CV signals.
- Mixers Mixers combine multiple signals together.
- Shapers Shapers are modules that perform various waveshaping operations such as saturation, bit crushing or sample rate reduction on audio signals. While filters work in the frequency domain to modify a signal’s spectral content, shapers work in the time domain by applying mathematical formulas to alter the voltage of the signal.
- Signal Processors Signal processors are modules that modify a signal in some useful way. For example, the Slew Limiter will limit the rate of change in a CV signal, the Delay will delay a signal by a given time, and the Inverter will invert the polarity of a signal. By itself, a signal processor will not do much, but judicious use of signal processors can add a new dimension to a patch.
- VCAs This category contains voltage controlled amplifiers (VCA), which control the amplitude of a signal from the amplitude of another signal. VCAs are used to vary the output volume of a patch, but also to modulate the amplitude of CV signals, thereby creating complex modulations from simple sources.
- Visualisers Visualisers are modules that provide visual feedback on the patch, either in the form of text (Patch Info) or graphical signal representation (Level).
For more information on how to add new modules to a patch, please refer to the Patching—Adding Modules section.
Effect Rack ⚓︎
The Effect Rack is only available when using Multiphonics CV‑3 in standalone or as an instrument plug-in in a DAW; it is not included in the effect plug-in.
The Effect Rack provides access to all output effect parameters. You can open it using the gear icon in the Effects module and close it with the X at the top-right of the window.
Settings Panel ⚓︎
The Settings panel is only available when using Multiphonics CV‑3 in standalone or as an instrument plug-in in a DAW; it is not included in the effect plug-in.
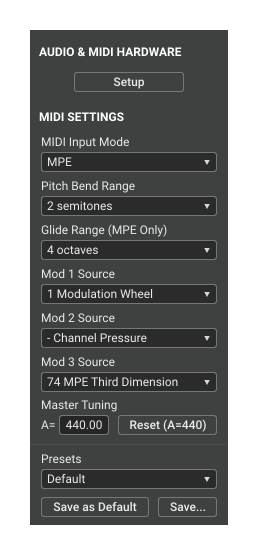
Audio & MIDI Setup ⚓︎
This section is not available when using Multiphonics CV‑3 as a plug-in in a DAW.
The Setup button opens the Audio & MIDI Setup window, where you can choose your audio output and MIDI input devices. This is described in the Introduction—Audio and MIDI Configuration section.
MIDI Settings ⚓︎
The MIDI settings adjust how the Keyboard module responds to MIDI input.
When using Multiphonics CV‑3 in a DAW, these settings will automatically be saved with your project so that each plug-in instance can have a different MIDI configuration. When loading a new plug-in instance, it will start with the default settings. Use the Save as Default button to change the default settings.
MIDI Input Mode
Selects between the three modes of operation:
MPE In this mode, Multiphonics supports MIDI Polyphonic Expression. This allows each note to have its own pitch bend (used for glides between notes), channel pressure and CC#74 (timbre) modulation—provided your DAW or MIDI controller supports it. Read the MPE Implementation Notes for more information. This mode also works seamlessly with non-MPE setups as long as your DAW or MIDI controller is set to channel 1.
Omni (all channels) In this mode, Multiphonics responds to all channels. Pitch bend, channel pressure, and MIDI control changes (CC) will only affect notes on the same channel. This mode can be a good choice for pre-MPE controllers with channel-per-note functionality or multi-keyboard setups such as digital organs.
Channel In this mode, Multiphonics only responds to the selected MIDI channel. Use this to play from a single channel in a setup with multiple MIDI controllers on different channels, or with a MIDI controller that splits its keyboard into separate channels.
The default mode is MPE, as it is also compatible with standard MIDI keyboards and DAWs that don’t support MPE.
Pitch Bend Range
Sets the maximum MIDI pitch bend range.
In MPE mode, this controls the global (master) pitch bend range, not the glide range.
Glide Range
Sets the maximum MPE glide range. The MPE specification says that the default glide range should be ±4 octaves. This is ideal for MPE controllers that allow gliding smoothly between notes. However, on some controllers, the MPE glide is limited to a small left and right movement better suited for vibrato or short bends than massive glissandos. Depending on your hardware or software MPE setup and how you intend to use it, here are the recommended Glide Range settings for Multiphonics:
Controller that allows gliding between notes Keep the Glide Range at ±4 octaves to ensure precise gliding on the controller, in accordance with the MPE specification.
Controller with restricted glide gesture and an on-board glide range setting Adjust the glide range on your controller and keep the Multiphonics Glide Range setting at the ±4 octaves default. Don’t adjust it on both sides! It would further restrict the glide range.
Controller with restricted glide gesture but without an on-board glide range setting Set the Glide Range setting to the maximum bend or vibrato depth you want to play. On these controllers, setting a too-high value may result in out-of-tune notes caused by small unintended glides while playing.
Manual programming from a DAW without an MPE controller Adjust the Glide Range to match the maximum glide you aim to program into your track. Leaving it at ±4 octaves is probably the best choice in a DAW that displays the glide automation curve over a piano roll, allowing precise glides between notes.
This setting is only active when MPE mode is selected.
Modulation Sources
The Modulation Source drop-down menus let you choose which MIDI control change is mapped to the Mod 1, 2 and 3 CV output on the Keyboard module.
You can choose any standard MIDI control change or channel pressure (sometimes called monophonic aftertouch) from a drop-down list, or you can select the MIDI Learn option and move one of these controls on your MIDI controller.
MIDI Learn always listens to control changes on all MIDI channels, no matter what MIDI Input Mode is currently active.
The same menu can be accessed by clicking on the Mod labels directly on the Keyboard module.
Master Tuning
Sets the frequency of the A above middle C.
The Reset (A=440) button resets the master tuning to the standard A=440 Hz tuning.
Preset
Multiphonics offers a few MIDI settings presets for different types of controllers. Simply choose a preset from the drop-down menu to load it.
If you use Multiphonics with different MIDI setups, you can save your own MIDI settings presets.
The Save as Default button will save the current MIDI settings to be used as default settings when loading new Multiphonics CV‑3 plug-in instances.
CPU Meter ⚓︎
A CPU meter is located at the bottom of the Settings panel. The sound may stutter if this goes above 80%.
Please be aware that modern CPUs will automatically adjust their clock speed to preserve energy depending on the demands of the running software. This means that on some computers, a very simple patch may display a higher CPU usage percentage than a complex patch, because the CPU will run at a lower clock speed when the simple patch is loaded.
On-screen Keyboard ⚓︎
The On-screen Keyboard is only available when using Multiphonics CV‑3 in standalone or as an instrument plug-in in a DAW. It is not available when running as an effect plug-in.
The bottom panel provides an on-screen keyboard, which can be useful to trigger patches when no MIDI keyboard is available. The on-screen keyboard can be transposed with the Octave arrows.
-
In Multiphonics, a preset is called a patch. This word comes from the modular world where it refers to how modules are connected with patch cables to create a sound. ↩︎